The short answer
Tile and grout do not stop water; cementitious grout passes water and vapor, so a shower depends on a waterproofing layer behind the tile. The main approaches are bonded sheet membranes, liquid-applied membranes, and traditional mortar pans with a liner under the tile bed. Each works when installed to its manufacturer's instructions and fails at the same places: the drain connection, corners, seams, niches, benches, curbs and penetrations.
Florida's plumbing code requires shower pan liners to slope to the drain, turn up the walls at least 2 inches above the threshold and pass a flood test before being covered. Asking which system was used, seeing the membrane before tile goes on and confirming the pan was flood tested are the practical ways to verify the work.
Key takeaways
- Waterproofing happens behind the tile. Tile and grout are finishes, not barriers.
- Every system has a manufacturer's method. Mixing components from different systems can void warranties and create weak points.
- Traditional liners need a sloped base under them, the pre-slope, so water reaching the liner drains instead of sitting.
- The code flood test holds water in the pan for at least 15 minutes; many installers test longer.
- Steam showers need vapor-resistant systems and details that ordinary showers do not.
Why So Many Shower Failures Start With Water
When a tiled shower fails, the symptoms usually appear somewhere else: a stain on the ceiling below, swollen baseboard outside the shower, loose tiles, dark grout that never dries, a musty smell, or a soft spot in the floor. Behind those symptoms, the cause is usually water getting past the tile and reaching something that cannot handle it.
Tile itself is not the problem. Porcelain and ceramic tiles shed water, but the joints between them do not. The Tile Council of North America notes that cementitious grout easily transmits water and vapor. So every shower relies on a layer behind the tile: a membrane or liner that stops water and sends it to the drain.
When that layer is missing, incomplete or poorly connected to the drain, water saturates the tile bed, the backer board and eventually the framing or slab. In a humid climate, those materials dry slowly, which is when mold and rot begin.
Backer Boards and What They Do
The backer board is the surface the membrane and tile attach to. Common options include cement board, fiber-cement board, foam-core boards and gypsum-core boards designed for wet areas. They resist rot and hold tile, but most are not waterproof on their own; water passes through cement board, for example. Foam-core boards are often part of complete waterproofing systems, with their seams treated as the manufacturer specifies.
Regular drywall, including moisture-resistant drywall, is not a shower backer. The backer, membrane and tile setting materials should be compatible, which is simplest when they come from the same system or are approved together by the membrane manufacturer.
Sheet Membrane Systems
Sheet membranes are thin, flexible waterproof sheets bonded to the backer board or substrate with thin-set mortar, with tile set directly on top. Well-known examples include Schluter’s KERDI, a sheet membrane its manufacturer lists as meeting the ANSI A118.10 standard for bonded waterproof membranes and as suitable for intermittent-use steam showers.
Sheet systems give a consistent thickness, since the membrane is manufactured rather than applied by hand, and they are often part of complete systems with preformed trays, curbs, niches, bonding flange drains and pre-cut corners. Their weak points are the seams and corners, where pieces overlap or are joined with sealing bands, and the transitions to the drain and penetrations.
Seam Treatment
Sheet membrane seams are overlapped or covered with strips, and inside and outside corners use preformed pieces, all bonded with the thin-set or sealant the manufacturer specifies. Skipped overlaps, wrinkled seams and gaps at corners are common failure points. Each system’s installation guide specifies the overlap width and method, and following it exactly is what makes the seams waterproof.
Liquid-Applied Membranes
Liquid membranes are rolled, brushed or troweled onto the backer board and cure into a continuous, rubbery waterproof film. Examples include Custom Building Products’ RedGard and LATICRETE’s Hydro Ban, both of which their manufacturers list as meeting ANSI A118.10.
The advantage is a continuous film that wraps corners, niches and penetrations without separate pieces. The weakness is thickness control: the membrane only works at the thickness the manufacturer specifies, and that depends on the installer. Product instructions spell out the requirements. RedGard, for example, calls for two coats at a set coverage rate per gallon, while Hydro Ban specifies two coats cured to a target thickness measured in mils. Fabric reinforcement is typically embedded at changes of plane and seams in the backer board.
Liquid membranes need curing time before flood testing and tile, which depends on temperature and humidity and is set by the product.
Traditional Mud Pan and Liner
The traditional method builds the shower floor from layers:
- A pre-slope of mortar sloping to the drain.
- A waterproof liner, often PVC or CPE sheet, over the pre-slope, turned up the walls and clamped into a special drain with weep holes.
- A mortar bed over the liner, sloped to the drain, which holds the tile.
Water that passes through the grout and mortar bed reaches the liner, flows along the pre-slope to the drain’s weep holes and exits. The walls are waterproofed separately, with the wall barrier lapped over the liner.
This method has a long track record and is recognized in Florida’s plumbing code, which lists materials for shower liners, including PVC and CPE sheet, sheet lead and copper, and both sheet-applied and liquid membranes meeting ANSI A118.10.
Corners, Curbs and Niches: The Failure Points
Most leaks start where the waterproofing changes direction or is interrupted:
- Inside corners, where walls meet each other and the floor.
- The curb, where the pan liner or membrane wraps over and down, and where glass or doors are later fastened.
- Niches and benches, which add inside and outside corners and horizontal surfaces that must slope to shed water.
- Penetrations for the valve, shower head, body sprays and grab bar anchors.
- The drain connection, where the membrane joins the drain body.
- Transitions between the pan and the walls, and between systems.
Horizontal surfaces inside the shower, including niche bottoms, bench tops and curb tops, need a slight slope toward the shower so water does not pool on them.
Bonding Flange Drains
Sheet and liquid membrane systems usually use a drain with a wide flange that the membrane bonds to directly, so water on the membrane flows straight into the drain. The connection between membrane and flange is one of the most important details in the shower. Traditional pans use a clamping-ring drain instead, where the liner is clamped between two parts of the drain and weep holes let water from the mortar bed escape. Using the drain designed for the waterproofing method, and keeping the weep holes clear, matters as much as the membrane itself.
Pre-Slope: The Step Most Skipped
In a traditional pan, the liner has to slope toward the drain. Florida’s residential code describes this as a smooth, solidly formed subbase that slopes the liner to the weep holes. Without it, the liner lies flat on the subfloor, water that reaches it pools instead of draining, and the mortar bed above stays wet. The result is often a shower that looks fine but smells musty, grows mold in the grout and eventually fails.
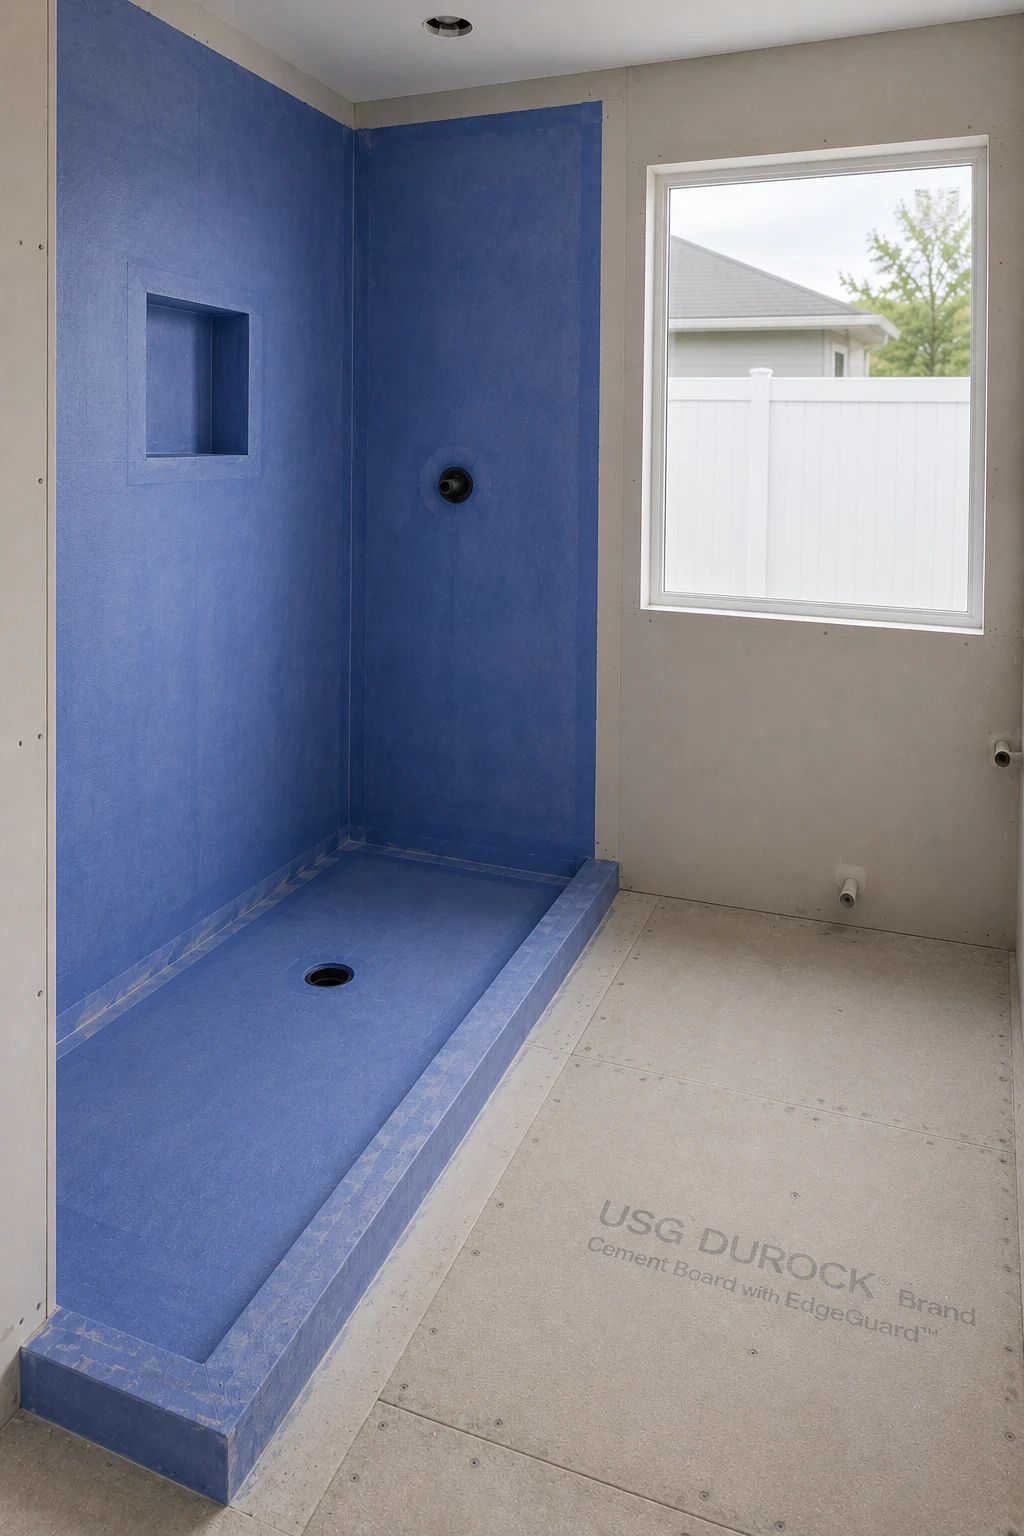
Pre-slope is easy to skip because it is hidden once the liner is in. Sheet and liquid membrane systems avoid the issue differently: the waterproofing sits on top of the sloped mortar bed or preformed tray, directly under the tile, so water never soaks into a thick mortar bed.
Flood Testing Before Tile
A flood test proves the pan holds water before it is covered. Florida’s plumbing code requires shower liners to be tested by plugging the drain and filling the pan with water to at least 2 inches deep at the threshold, and holding it for at least 15 minutes without leaks. The building inspector may witness it as part of the rough plumbing inspection.
Many installers and membrane manufacturers recommend longer tests, often much longer than the code minimum, to catch slow leaks. The membrane must be fully cured before testing, according to the product’s instructions. Marking the water level and checking for any drop, and looking for moisture at the edges and below, gives confidence that the pan is sound before tile goes on.
Penetrations and Fixtures
Every hole in the waterproofing is a potential leak: the valve body, the shower arm, hand shower outlets, body sprays and the anchors for glass hardware and grab bars. Systems provide collars, gaskets or sealing methods for pipe penetrations, and anchors for glass and grab bars need to be sealed where they pass through the membrane. Planning fixture and hardware positions before waterproofing, and adding blocking behind them, reduces the number of penetrations made later through finished tile.
Choosing a System
No single waterproofing method is best in every shower. Factors that guide the choice include:
- Installer experience: a system installed exactly as designed outperforms a theoretically better one installed loosely.
- Warranty: some manufacturers offer system warranties when their components are used together.
- Shower type: curbless showers, benches and large niches suit bonded membranes; steam showers need vapor-resistant products rated for steam.
- Schedule: liquid membranes need drying time between coats and before testing; sheet systems can often be tiled sooner.
- Budget: preformed trays, curbs and niches cost more in materials but can save labor.
Asking the installer why a particular system was chosen, and whether all components come from it, is a reasonable way to gauge how carefully the shower is being planned.
Repairing vs Rebuilding a Leaking Shower
Not every leak means the shower has to be rebuilt. When water escapes through failed caulk at the glass, cracked grout at a corner, or around a loose valve trim, surface repairs can stop it: new caulk, re-grouting and resealing penetrations. A plumber can also rule out a leaking valve or supply line inside the wall, which is a plumbing repair rather than a waterproofing one.
When the pan or membrane itself has failed, such as water appearing below the shower even with the valve off and joints sealed, or tiles that are loose across a wide area, surface repairs only delay the problem. The lasting fix is removing the tile and rebuilding the waterproofing. Testing before deciding, for example running water only on the floor or only on one wall and watching for leaks, helps separate the two situations.
How to Verify Your Contractor Did It Right
Most of the waterproofing is invisible once tile is set, so verification happens during construction:
- Ask which system will be used, by name, and whether all components come from the same system.
- Ask to see the waterproofing before tile, or for photos of the complete membrane, corners, niches, curb and drain connection.
- Confirm the flood test was done, for how long, and whether it was inspected.
- Check the slope: water should run to the drain without puddling once the shower is finished.
- Look at the transitions at the curb and walls, and where glass will be fastened.
- Keep the documentation, including product names and photos, for future repairs and warranty claims.
These questions are reasonable for any bathroom contractor and do not require technical expertise to ask.
Vapor Management in Humid Climates
Water vapor behaves differently from liquid water. Hot showers drive vapor into walls, and in a humid climate the walls around a shower may already hold moisture. Some waterproofing products also act as vapor retarders, while others are not intended to. Manufacturers’ data sheets list permeance ratings, and steam showers require products and assemblies rated for continuous steam, often with a separate vapor barrier as the product instructions specify.
Where the shower sits on an exterior wall, how the wall assembly dries matters too. These details are part of the system selection, and a fan that actually clears steam reduces the moisture load on every surface, which is the subject of ventilation and mold prevention.
Waterproofing is the part of a bathroom remodel that cannot be fixed later without removing the tile, which is why the system, the details and the flood test deserve attention before the first tile is set.
Showers built where a tub used to be follow the same principles, with the added step of changing the drain and valve, as described in replacing a tub with a walk-in shower.
Share this article